- Как создать криптовалютный дашборд с помощью Plotly и API Binance
- Как установить API Binance
- Настраиваем реальный API Binance
- Настраиваем тестовый API Binance
- Как получить данные с помощью API Binance
- Устанавливаем библиотеку python-binance
- Получаем информацию об аккаунте
- Получаем архивные данные
- Получаем данные в реальном времени
- Как создать дашборд с помощью Plotly
- Getting Started
- Installation
- Register on Binance
- Generate an API Key
- Initialise the client
- Using the Spot, Futures or Vanilla Options Testnet
- Using a different TLD
- Making API Calls
- Async API Calls
- API Rate Limit
- Pip install python binance
- About
- Problem with pip install python-binance #206
- Comments
- aaasakkura commented Mar 6, 2018 •
- mdennis281 commented Mar 9, 2018
- aaasakkura commented Mar 9, 2018
- mdennis281 commented Mar 9, 2018
- aaasakkura commented Mar 10, 2018
- tablego00 commented Mar 13, 2018
- pandaoknight commented May 11, 2018
- python-binance 1.0.12
- Navigation
- Project links
- Statistics
- Maintainers
- Classifiers
- Project description
- Features
- Upgrading to v1.0.0+
- Quick Start
- Async Example
- Donate
- Other Exchanges
Как создать криптовалютный дашборд с помощью Plotly и API Binance
Упрощаем отслеживание активов
Как установить API Binance
Binance предоставляет два типа доступа к API: реальный и тестовый.
Настраиваем реальный API Binance
Реальный API обеспечивает прямой доступ к аккаунту. В нем будут отражены любые сделки, совершенные через этот API. Поэтому использовать его следует с осторожностью.
Для начала нужно зарегистрироваться на Binance.

После регистрации вам будет предложено установить двухфакторную аутентификацию (2FA). Вы также можете подключить ее самостоятельно в настройках безопасности.
Затем переходим во вкладку API Management в настройках. Вам будет предложено установить метки для ключей API. Эта функция пригодится тем, у кого есть несколько ключей, связанных с одним аккаунтом.
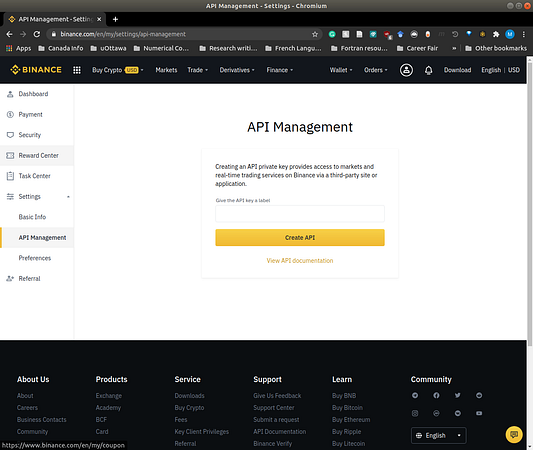
Указываем метки и нажимаем Create API. После этого нужно пройти аутентификацию еще раз. Затем отобразятся API Key и Secret Key. Скопируйте их в безопасное место. По умолчанию получить доступ к ключам можно следующим способом, который можно изменить:
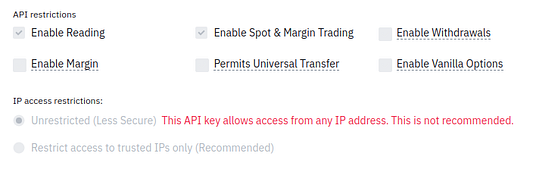
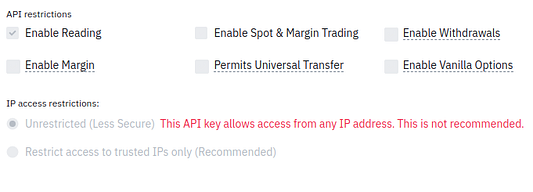
Мы будем использовать ключи как реального, так и тестового API, чтобы понять, как с ними работать. С целью не засорять реальный аккаунт установим доступ только для чтения для ключей реального API:
Сохранять ключи реального API мы будем в файл secret.cfg , как показано ниже. Не забывайте, что нельзя ни с кем делиться этим файлом.
Настраиваем тестовый API Binance
Тестовый API Binance полностью имитирует взаимодействие с реальным API. Рекомендуем для начала повзаимодействовать с ним, чтобы убедиться в корректности работы приложения.
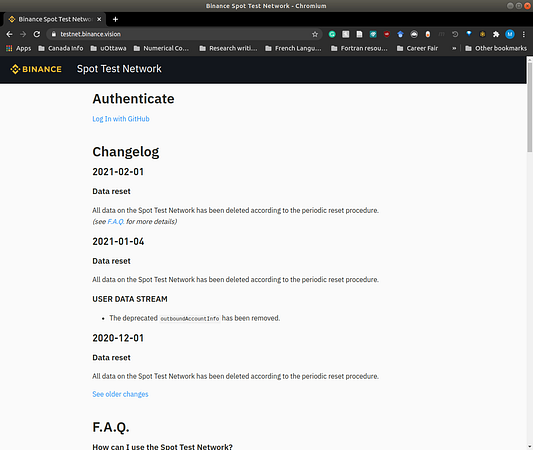
Для начала необходимо войти в систему: https://testnet.binance.vision/ (на данный момент вход поддерживается только с GitHub).
Затем нажмите на Generate HMAC_SHA256 Key (Сгенерировать ключ HMAC_SHA256) и снова укажите метки для ключей. Отобразившиеся после создания ключи также скопируйте в безопасное место. Все подробности о тестовом API можно прочитать на главной странице.
Теперь добавим ключи тестового API в файл secret.cfg , как показано ниже:
Мы успешно настроили ключи реального и тестового API и сохранили их в файле secret.cfg . Теперь можно переходить к получению данных.
Как получить данные с помощью API Binance
Устанавливаем библиотеку python-binance
Binance не предоставляет библиотеку Python для взаимодействия с API. Поэтому мы воспользуемся популярным сторонним инструментом под названием python-binance .
Устанавливаем python-binance с помощью следующей команды:
Получаем информацию об аккаунте
В этом разделе мы воспользуемся тестовым аккаунтом. По умолчанию в нем будет отображаться баланс различных криптовалют. У python-binance нет доступа к тестовому API, поэтому мы поменяем URL-адрес конечной точки.
Код ниже предоставляет информацию о тестовом аккаунте:

Мы получаем такие важные данные, как тип аккаунта ( accountType ), баланс, разрешение и прочие.
Теперь получим баланс ETH:

Библиотека python-binance предоставляет много возможностей. Подробную информацию о ней можно найти в документации.
Получаем архивные данные
Тестовый API выдает фиктивные архивные данные. Поэтому мы воспользуемся реальным API и его ключами.
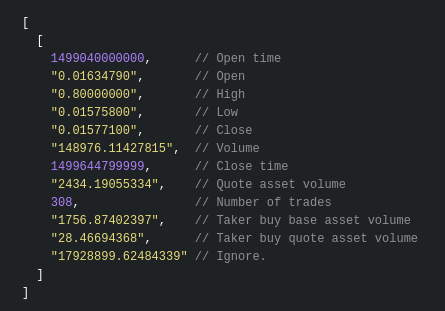
Ниже показано, как получить стоимость ETH на Binance с самой ранней даты до текущего дня:

Вывод выше представляет следующие параметры, упомянутые в документации Binance API:
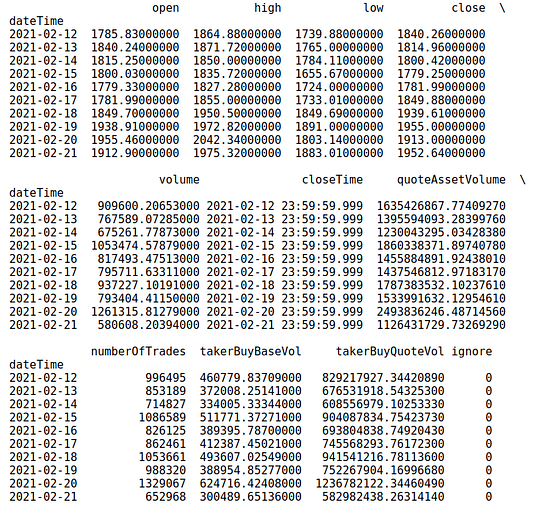
Преобразовываем полученные данные в датафрейм и сохраняем его как файл CSV:
Получаем данные в реальном времени
Чтобы передавать данные в реальном времени, можно воспользоваться WebSocket Binance. Вот как это сделать:

Ниже показано, как остановить потоковую передачу данных и закрыть WebSocket:
Итак, мы научились получать данные несколькими способами. Теперь можно переходить к созданию дашборда Plotly.
Как создать дашборд с помощью Plotly
В этом разделе мы создадим дашборд с помощью Plotly, который будет отслеживать криптовалютный портфель тестового аккаунта в реальном времени и изменять его общую стоимость в зависимости от получаемых данных.
Вот как будет выглядеть финальная версия дашборда. Детали внешнего вида можно изменить позднее:
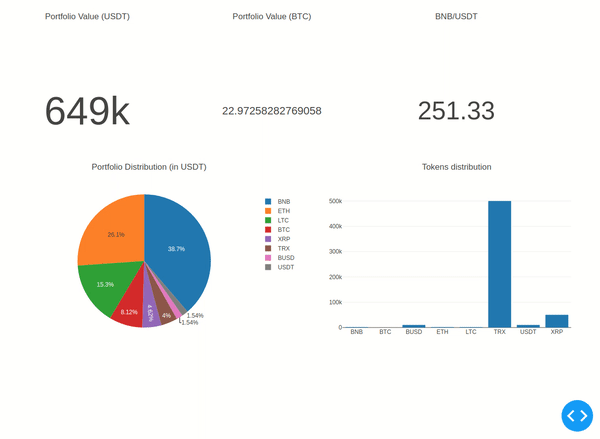
В дашборд включены следующие функции:
- Индикатор: общая стоимость портфеля в USDT.
- Индикатор: общая стоимость портфеля в BTC.
- Индикатор: конвертация BNB/USDT.
- Круговая диаграмма: распределение портфеля (в USDT).
- Столбчатая диаграмма: распределение токенов.
Теперь рассмотрим код.
- Импортируем все необходимые библиотеки:
2. Прочитываем все ключи, устанавливаем соединение и получаем информацию об аккаунте:
3. Определяем функции, которые будут обрабатывать потоковые данные и рассчитывать показатели на их основе:
4. Начинаем передавать данные в реальном времени:
5. Определяем макет, графики и хостинг:
Вот и все! Этот код позволяет отслеживать криптовалютный портфель тестового аккаунта. Его можно с легкостью настроить и для реального аккаунта без изменения URL-адреса конечной точки.
Весь код можно найти в репозитории на GitHub.
Источник
Getting Started
Installation
python-binance is available on PYPI. Install with pip :
Register on Binance
Generate an API Key
To use signed account methods you are required to create an API Key.
Initialise the client
Pass your API Key and Secret
or for Asynchronous client
Using the Spot, Futures or Vanilla Options Testnet
Binance offers a Spot, Futures and Vanilla Options Testnet, to test interacting with the exchange.
To enable this set the testnet parameter passed to the Client to True.
The testnet parameter will also be used by any websocket streams when the client is passed to the BinanceSocketManager.
or for Asynchronous client
Using a different TLD
If you are interacting with a regional version of Binance which has a different TLD such as .us or ` .jp’ then you will need to pass this when creating the client, see examples below.
This tld will also be used by any websocket streams when the client is passed to the BinanceSocketManager.
or for Asynchronous client
Making API Calls
Every method supports the passing of arbitrary parameters via keyword matching those in the Binance API documentation. These keyword arguments will be sent directly to the relevant endpoint.
Each API method returns a dictionary of the JSON response as per the Binance API documentation. The docstring of each method in the code references the endpoint it implements.
The Binance API documentation references a timestamp parameter, this is generated for you where required.
Some methods have a recvWindow parameter for timing security, see Binance documentation.
API Endpoints are rate limited by Binance at 20 requests per second, ask them if you require more.
Async API Calls
aiohttp is used to handle asyncio REST requests.
Each function available in the normal client is available in the AsyncClient class.
The only difference is to run within an asyncio event loop and await the function like below.
Read Async basics for Binance for more information about asynchronous patterns.
API Rate Limit
Check the get_exchange_info() call for up to date rate limits.
At the current time Binance rate limits are:
- 1200 requests per minute
- 10 orders per second
- 100,000 orders per 24hrs
Some calls have a higher weight than others especially if a call returns information about all symbols. Read the official Binance documentation for specific information.
On each request Binance returns X-MBX-USED-WEIGHT-(intervalNum)(intervalLetter) and X-MBX-ORDER-COUNT-(intervalNum) headers.
Источник
Pip install python binance
Welcome to python-binance v1.0.12
Updated 11th May 2021


This is an unofficial Python wrapper for the Binance exchange REST API v3. I am in no way affiliated with Binance, use at your own risk.
If you came here looking for the Binance exchange to purchase cryptocurrencies, then go here. If you want to automate interactions with Binance stick around.
If you’re interested in Binance’s new DEX Binance Chain see my python-binance-chain library
Make sure you update often and check the Changelog for new features and bug fixes.
- Implementation of all General, Market Data and Account endpoints.
- Asyncio implementation
- Testnet support for Spot, Futures and Vanilla Options
- Simple handling of authentication
- No need to generate timestamps yourself, the wrapper does it for you
- Response exception handling
- Websocket handling with reconnection and multiplexed connections
- Symbol Depth Cache
- Historical Kline/Candle fetching function
- Withdraw functionality
- Deposit addresses
- Margin Trading
- Futures Trading
- Vanilla Options
- Support other domains (.us, .jp, etc)
Upgrading to v1.0.0+
The breaking changes include the migration from wapi to sapi endpoints which related to the wallet endpoints detailed in the Binance Docs
The other breaking change is for websocket streams and the Depth Cache Manager which have been converted to use Asynchronous Context Managers. See examples in the Async section below or view the websockets and depth cache docs.
Generate an API Key and assign relevant permissions.
If you are using an exchange from the US, Japan or other TLD then make sure pass tld=’us’ when creating the client.
To use the Spot or Vanilla Options Testnet, pass testnet=True when creating the client.
Read Async basics for Binance for more information.
If this library helped you out feel free to donate.
- ETH: 0xD7a7fDdCfA687073d7cC93E9E51829a727f9fE70
- LTC: LPC5vw9ajR1YndE1hYVeo3kJ9LdHjcRCUZ
- NEO: AVJB4ZgN7VgSUtArCt94y7ZYT6d5NDfpBo
- BTC: 1Dknp6L6oRZrHDECRedihPzx2sSfmvEBys
If you use Binance Chain check out my python-binance-chain library.
If you use Kucoin check out my python-kucoin library.
If you use IDEX check out my python-idex library.
About
Binance Exchange API python implementation for automated trading
Источник
Problem with pip install python-binance #206
Comments
aaasakkura commented Mar 6, 2018 •
Hi, I installed Microsoft Visual Studio 2015, then 2017, and problem is still here.
I see red text with «Twisted» ending in the cmd.
binance.client doesn’t exist for python..
Windows 10, 64 bit, python 3.6.4
Thank you!
The text was updated successfully, but these errors were encountered:
mdennis281 commented Mar 9, 2018
I got this same issue. Look harder in the return.
You’re missing a dependency.
but like i said, it’s in the return of «pip install python-binance» in powershell (admin)
aaasakkura commented Mar 9, 2018
I have istalled Visual Studio 17
mdennis281 commented Mar 9, 2018
can you post the entire return of «pip install python-binance»?
aaasakkura commented Mar 10, 2018
Command «c:\users\vishniakov\appdata\local\programs\python\python36\python.exe -u -c «import setuptools, tokenize;file=’C:\Users\VISHNI 1\AppData\Local\Temp\pip-build-o6uovkfi\Twisted\setup.py’;f=getattr(tokenize, ‘open’, open)(file);code=f.read().replace(‘\r\n’, ‘\n’);f.close();exec(compile(code, file, ‘exec’))» install —record C:\Users\VISHNI 1\AppData\Local\Temp\pip-7g7f27qe-record\install-record.txt —single-version-externally-managed —compile» failed with error code 1 in C:\Users\VISHNI
tablego00 commented Mar 13, 2018
try to install twisted using wheel , then install python-binance again:
https://www.lfd.uci.edu/
pandaoknight commented May 11, 2018
If you are developing on Windows like me. That you should install Twisted by wheel
Источник
python-binance 1.0.12
pip install python-binance Copy PIP instructions
Released: Jun 3, 2021
Binance REST API python implementation
Navigation
Project links
Statistics
View statistics for this project via Libraries.io, or by using our public dataset on Google BigQuery
License: MIT License (MIT)
Author: Sam McHardy
Tags binance, exchange, rest, api, bitcoin, ethereum, btc, eth, neo
Maintainers
Classifiers
- Intended Audience
- Developers
- License
- OSI Approved :: MIT License
- Operating System
- OS Independent
- Programming Language
- Python
- Python :: 3
- Python :: 3.5
- Python :: 3.6
- Python :: 3.7
- Topic
- Software Development :: Libraries :: Python Modules
Project description
Updated 11th May 2021
This is an unofficial Python wrapper for the Binance exchange REST API v3. I am in no way affiliated with Binance, use at your own risk.
If you came here looking for the Binance exchange to purchase cryptocurrencies, then go here. If you want to automate interactions with Binance stick around.
If you’re interested in Binance’s new DEX Binance Chain see my python-binance-chain library
Make sure you update often and check the Changelog for new features and bug fixes.
Features
- Implementation of all General, Market Data and Account endpoints.
- Asyncio implementation
- Testnet support for Spot, Futures and Vanilla Options
- Simple handling of authentication
- No need to generate timestamps yourself, the wrapper does it for you
- Response exception handling
- Websocket handling with reconnection and multiplexed connections
- Symbol Depth Cache
- Historical Kline/Candle fetching function
- Withdraw functionality
- Deposit addresses
- Margin Trading
- Futures Trading
- Vanilla Options
- Support other domains (.us, .jp, etc)
Upgrading to v1.0.0+
The breaking changes include the migration from wapi to sapi endpoints which related to the wallet endpoints detailed in the Binance Docs
The other breaking change is for websocket streams and the Depth Cache Manager which have been converted to use Asynchronous Context Managers. See examples in the Async section below or view the websockets and depth cache docs.
Quick Start
Generate an API Key and assign relevant permissions.
If you are using an exchange from the US, Japan or other TLD then make sure pass tld=’us’ when creating the client.
To use the Spot or Vanilla Options Testnet, pass testnet=True when creating the client.
Async Example
Read Async basics for Binance for more information.
Donate
If this library helped you out feel free to donate.
- ETH: 0xD7a7fDdCfA687073d7cC93E9E51829a727f9fE70
- LTC: LPC5vw9ajR1YndE1hYVeo3kJ9LdHjcRCUZ
- NEO: AVJB4ZgN7VgSUtArCt94y7ZYT6d5NDfpBo
- BTC: 1Dknp6L6oRZrHDECRedihPzx2sSfmvEBys
Other Exchanges
If you use Binance Chain check out my python-binance-chain library.
If you use Kucoin check out my python-kucoin library.
If you use IDEX check out my python-idex library.
Источник