- Майнинг эфира на Ubuntu
- Майнинг эфира на Ubuntu
- 1. Установка кошелька
- 2. Установка драйверов
- 3. Установка майнера etherminer
- 4. Настройка кошелька
- 5. Выбор сети и пула
- 6. Запуск майнинга
- Выводы
- How to Mine Ethereum on Ubuntu 16.04/20.04
- Add Ethereum Repository
- Installing Ethminer
- Install packages
- Pick a network
- Choose a wallet
- Solo mining or pool mining
- Start mining!
- Mine Etherium With Ethminer on Ubuntu
- What Is Ethereum?
- What Is Ethminer?
- How to Install Ethminer
- How to Configure Ethminer to Mine Ether
- How to Tweak the Performance?
- Conclusion
Майнинг эфира на Ubuntu
Эфириум — это криптовалюта, подобная биткойну, основанная на технологии блокчейна. Однако это не ещё один клон биткойна, поскольку здесь есть дополнительные возможности, такие, как умные контракты, а количество монет не ограничено, это делает её уникальной и очень перспективной.
Мы не будем здесь подробно рассматривать, как работает эфир, вы можете найти эту информацию в интернете. Вместо этого мы поговорим, как его добыть. Чтобы получить монеты, нужно потратить вычислительные мощности вашего компьютера. Раньше было достаточно майнинга на процессоре, но по мере увеличения сложности нужно использовать видеокарты. Но, скорее всего, вы это знаете. А теперь перейдем ближе к тому, как настроить майнинг эфира на Ubuntu.
Майнинг эфира на Ubuntu
Вы можете майнить эфир и в Widows, но есть информация, что в Linux можно получить намного больше мегахэш, поскольку эти операционные системы устроенны по-разному.
1. Установка кошелька
Первым делом нужно установить необходимое программное обеспечение. В официальных репозиториях Ubuntu нужных программ нет, но вы можете установить консольный клиент эфириума из PPA. Для добавления репозитория в систему выполните:
sudo apt install software-properties-common
sudo add-apt-repository ppa:ethereum/ethereum
sudo apt update

Затем установите сам клиент:
sudo apt install etereum
С помощью этого клиента мы только создадим кошелек, для того чтобы майнить на мощностях видеокарты нужна другая программа. Для создания кошелька можно использовать любую другую программу, например Jaxx.
2. Установка драйверов
Майнинг эфира на Ubuntu с помощью видеокарты работает через OpenCL. А чтобы всё это работало с видеокартами NVIDIA, нужно установить для них проприетарные драйверы. Если у вас достаточно новая карта, возможно, у вас будут работать драйверы с открытым кодом, для всех же остальных нужны проприетарные. Скачайте подходящий драйвер с официального сайта:

Перед его установкой в систему нужно выстроить некоторые зависимости, поскольку во время процедуры будет собран драйвер ядра Linux:
sudo apt install linux-headers-amd64 build-essential
После того как установщик будет загружен, а построение зависимостей завершится без ошибок, вы сможете приступить к инсталляции драйвера, сначала дайте скрипту право на выполнение:
chmod +x NVIDIA-Linux-x86_64*
Затем запустите установку:

Также драйвер можно установить из репозиториев Ubuntu, но так вы получите более старую версию:
sudo apt install nvidia-375

После установки драйвера компьютер нужно перезагрузить.
3. Установка майнера etherminer
Консольный клиент эфириума тоже может майнить, но только на процессоре. Майнинг Ethereum на Ubuntu на GPU был вынесен в инструмент etherminer, но он почему-то не был добавлен в официальный репозиторий. К счастью, вы можете скачать исполняемый файл с GitHub:

Выберите архив tar.gz. Можно взять исходный код, в самом низу, но проще скачать исполняемый файл. Затем распакуйте архив:
tar xvpzf ethminer-0.11.0rc1-Linux.tar.gz
И скопируйте полученную программу в /usr/bin/local/:
cp bin/etherminer /usr/bin/local/
Теперь можно проверить будущую скорость майнинга:
Или тестируем скорость работы майнера в режиме CUDA:
Опция -M означает, что нужно провести тестирование, а -G — включает использование OpenGL. Сначала программа создаст специальный файл, а затем покажет среднее значение хэшрейта. На хорошей видеокарте вы увидите около 20-30 Mhash/s.
4. Настройка кошелька
Кошелек — это то место, где будут храниться монеты. Сеть Ethereum построена таким образом, что кошелек — это всего лишь закрытый ключ, а ваш баланс виден всем пользователям блокчейна. Каждый узел содержит полный блокчейн и может распространять его другим пользователям. Для создания кошелька мы будем использовать geth:
geth account new

Программа запросит у вас пароль, он защищает закрытый ключ вашего кошелька, любой, кто получит доступ к файлу и будет знать кодовую фразу, может получить доступ к кошельку. Также команда выведет длинную последовательность чисел в <>. Это адрес вашего кошелька. Этот адрес мы будем использовать для майнинга. Напоминаю, что вам необязательно использовать geth, подойдут и другие кошельки.
5. Выбор сети и пула
Дальше вам нужно определиться с двумя моментами — это сеть и пул. Сейчас Ethereum имеет две сети, первая называется Ethereum Core, а вторая — Ethereum Classic. В системе умных контрактов DAO была обнаружена ошибка, из-за которой злоумышленники смогли украсть деньги. Разарботчики Ethereum сделали опрос и решили, что последствия нужно отменить. Был сделан хардфорк, и убрана часть блоков. Но не все согласились, поэтому старая сеть продолжает существовать под именем Ethereum Classic. Хардфорк сохранил своё имя ETH.
Это важно понимать, потому что сложность добычи ETC намного ниже чем ETH, соответтсвенно ниже и цена. Нужно майнить Ethereum на Ubuntu в правильной сети.
Пул — это несколько объединенных компьютеров, которые пытаются найти решение блока быстрее остальных. Вы можете использовать соло-майнинг, когда вы добываете монеты одни, но тогда вы получите намного меньшее вознаграждение. Награда за находку блока разделяется между всеми участниками пула. Если вам нужен майнинг эфириума на Ubuntu в сети ETH, то используйте вот эти пулы.
6. Запуск майнинга
Теперь все готово, и вы можете майнить. Для запуска майнинга нужно передать команде ethminer адрес пула и вашего кошелька эфира:
ethminer -G -F http://yolo.ethclassic.faith:9999/0xАдресКолелька —farm-recheck 200
ethminer -G -F http://yolo.ethclassic.faith:9999/0x65efbce76ed01b198ca504726289f3e397e83c01 —farm-recheck 200
Теперь осталось только ждать, пока наберется достаточная сумма для вывода эфира на ваш кошелек.
Выводы
В этой статье мы рассмотрели, как майнить эфир на Ubuntu, в наше время, если у вас есть хорошая видеокарта, то это вполне прибыльное занятие. Надеюсь, эта информация была полезной для вас.
Источник
How to Mine Ethereum on Ubuntu 16.04/20.04

As of recently, a cryptocurrency craze has swept Internet communities. The people have found out that one does not need several thousand dollar-worth rig to mine cryptocurrency with a profit. Stores are short on graphics cards, and a gold fever has overtaken the miners. If you have a card with more than 2GB of VRAM, you too can attempt mining. Let’s take a look at the most common mining avenue – Ethereum.
Ethereum is considered to be a great coin to mine, with high potential profits. To mine Ethereum, you need a piece of software called ‘ethminer’, which is a command-line tool. It can be run on multiple Linux distributions, but in this article, we will focus on Ubuntu 16.0.4/20.04 and Debian 8.
Before we begin – in order to not waste your time, do not attempt mining with a card under 2GB of VRAM, as it’s unlikely it will be detected by the software and be able to mine anything. On top of that, if you are using a Nvidia card, you must use the proprietary driver. For AMD, the AMDGPU driver works just fine.
In this guide, I will show you how to install Ethminer on Ubuntu using the terminal.
Add Ethereum Repository
First off, we need to add the Ethereum repository, so run the following commands in your terminal:
If you are running Debian, the repository name needs to be replaced:
Installing Ethminer
We can finally get to installing ethminer. However, on top of that, we will need additional packages: Geth and Ethereum:
Install packages
Run the following to install the required packages:
To use ethminer required for coin mining, we have to download it from GitHub:
At the time of writing this tutorial, the latest version was ethminer 0.19.0-alpha.0
Type the following to download and extract the binary file:
Pick a network
There are two for Ethereum. Ethereum Classic, known as ETC, and Ethereum, known as ETH.
For a miner, the main difference is in price and difficulty of mining. The higher the difficulty, the less coins you will mine. You need to choose a coin, which will bring you the best profits. As of time of writing, ETH has a better ratio. A power of 20 megahashes will bring you $29 of profit, compared to ETC’s $15, with the same power consumption.
Choose a wallet
I’ll assume you’ll be mining ETH; thus, I suggest to use this wallet. The password you set is permanent, do not lose it, as you will lose everything you keep inside the wallet. Set it up, and then we will move onto the next point.
Solo mining or pool mining
Generally, at a low hashrate, you want to mine in a pool, because of greater rewards. It will also take you a longer time to receive profits from solo mining.
Pick a pool from this list.
There might be other pools than the one from the list – find one that you find suits you the best.
Start mining!
As stated by the application, by default, ethminer will try to use all device types it can detect. Optionally you can limit this behavior setting either of the following options:
Then, execute a mining command, usually stated on the pool website.
For dwarfpool, it’s:
Instead of YOUR_WALLET, paste your wallet address.
The output on a RX480 card should be:
Although the byte count will depend on how much VRAM does your specific model have. And here you go! You’re now mining Ethereum on Linux.
With just a few commands, you’ve got a cryptocurrency miner at your disposal. Ethminer has the advantage of being free over other solutions while keeping the same speed and efficiency as proprietary software. If you would like to know more about such great Linux software, stay tuned.
Источник
Mine Etherium With Ethminer on Ubuntu
What Is Ethereum?

Figure 1 Credits to https://ethereum.org/
That being said it is actually used to fuel this ecosystem known as Ethereum. Ethereum is a decentralized platform with its block chain for its apps to function, and these apps are powdered by these tokens known as ether. So basically ether may or may not be used as a currency, but rather as a fuel to power the Ethereum ecosystem, however it’s widely used as fungible currency as an alternative to bitcoins.
Furthermore, like Bitcoins, Ethereum can be mined, and this process is known as mining ether. Even though the term Ethereum is used interchangeably, it’s more appropriate to use the term ether as it’s actually mined through this process. Ether can be mined with either CPU or GPU, and there are many miners around the world developed by various professionals specifically for this purpose only. The mined tokens then can be stored in wallets, which then can be exchanged or consumed to fuel the app running on Ethereum ecosystem.
What Is Ethminer?
This articles demonstrates how to make use of Ethminer which is used to mine ether with the help of a GPU. Ethminer is an open source cross platform application developed specifically for mining ether, and makes use of OpenCL, and Nvidia CUDA technologies for mining purposes. It also supports stratum protocol which is used for pool mining across a network; hence it can be used even without having a physical computer nearby, as long as the user has access to the Internet that’s all that is needed.
Ethminer is at the moment developed for Windows, MacOS and Linux, and uses the command line to execute its codes. App developers use AppVeyor, and Travis CI which respectively generate Windows executables and MacOS, Linux executables with each commit made in the Github repository, and thus there is no need to compile the source codes like with many Bitcoins miners available out there. Ethminer is easy to use, and extremely fast as long as the recommended hardware is utilized for mining purpose.
How to Install Ethminer
Ethminer, at a glance does seem hard to install, at least on Linux systems, but it’s actually rather easy to install given the right commands. This tutorial assumes the user has either Ubuntu 16 or 17, but it may still work for both newer and older versions as well though it isn’t recommended. Since Ubuntu is free of charge, it’s recommended to upgrade to at least Ubuntu 16.04 prior to following these steps.
The installation assumes the user has either AMD or Nvidia hardware installed on the system, and some steps of the installation should be slightly altered depending on the graphics card.
1. First install the graphics drivers. If it’s unable to locate the information related to the graphics adapter, use the following commands in the terminal. Either one is fine, however the second command requires access to the root as it returns more information of the graphics adapter.
2. Once the currently installed graphics adapter is located, note it down somewhere as it’s useful in later steps.
3. Now install the appropriate graphics driver. Only Nvidia and AMD GPUs are supported at the moment, however CPU mining is also possible through Go-Ethereum which has native support for CPUs, but it’s not recommended to use CPUs to mine as it’s not feasible to generate a profit out of it.
- Visit this URL for Installation instructions for Nvidia: https://linuxhint.com/install-nvidia-drivers-linux/
- Visit this URL to download Nvidia drivers for Ubuntu http://www.nvidia.com/Download/Find.aspx?lang=en-us
- Visit this URL to download AMD drivers for Ubuntu http://support.amd.com/en-us/download/linux
4. Now depending on the hardware adapter, install the appropriate graphics driver.
5. For Nvidia adapters, install the CUDA toolkit. CUDA is a property API (application programming interface) developed for general purpose processing on CUDA enabled hardware such as most of Nvidia graphics adapters. This is useful for a range of applications such as mathematical calculations, video and audio converting, simulation applications. Make sure to use sudo su and get root access.
6. For AMD adapters, install OpenCL ICD (installable client driver) which allows multiple implementations of OpenCL to exist on the same system. OpenCL is same as CUDA, an API for general purpose processing, but works on a range of hardware devices, including Nvidia graphics adapters as well.
7. Once either step is completed, install GIT package for retrieving the latest sources of Ethminer, MESA developer package which is a 3D graphics library works on graphics adapter to assist in mining, then cmake to build the sources.
8. Now make a directory to store retrieved Ethminer sources, and then focus on that directory. Creating the directory in Terminal makes the folder in the HOME directory of the currently logged in user. CD changes the focus to the stated folder.
9. Retrieve the source codes from Github straightly to aforesaid folder with the following command.
10. Then Build the sources with cmake.
11. To gain full potential on graphics adapters, use the DETHASHCUDA=ON flag DETHASHCL=OFF flags. What these flags do are respectively enable CUDA, and disable OpenCL. So, the cmake step should be slightly altered like this
12. Additionally if pool mining is intended to be used, then append the following flag as well to enable Stratum protocol. -DETHSTRATUM=ON, then cmake is altered like this.
13. Once the package is built, now it’s time to install it. So install it with the following command. This assumes the user is already in root access as suggested earlier.
14. Now use the following command to make sure it’s installed for sure. If it shows the available command lines, it means Ethminer is installed in the system successfully, otherwise repeat these previous steps at the outset until it’s sorted out.
15. Additionally, to find out the performance of the available hardware adapter, use one of the following commands. The OpenCL one is for measuring the performance of AMD adapters, and CUDA one is for measuring the performance of NVidia adapters.
- OpenCL Benchmark
- CUDA Benchmark
How to Configure Ethminer to Mine Ether
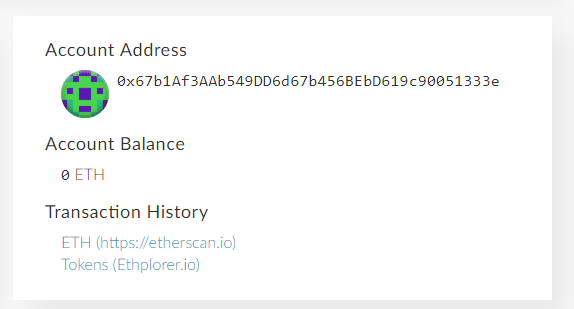
Once Ethminer is installed on the system, the remaining part is configuring it so it’s ready to be used to mine Ether. First of all, before initiating the mining, it’s important to get a valid Ethereum address which is used to retrieve mined Ether. This address is a public; hence it’s shareable, however the given private key is supposed to be kept hidden.
- Visit the following web URL https://www.myetherwallet.com
- Type a valid password and create a wallet to store Ether.
- Now save the given Keystore file which contains relevant information of the wallet.
- After it’s downloaded, proceed by clicking “I understand, Continue” button.
- Save the Private Key. The Website lets users to print it on a paper too. Once the address is saved, proceed by clicking “Save Your Address” button.
- Then it will ask how would you like to access to your wallet, what it means how to retrieve information related to the account. This basically contains “Account Address”, “Account Balance in ETH”, “Transaction History”, “Private Key”, “Public Ethereum Address”.
- Use the following command in Terminal window after filing stated placeholders. HashRate is calculated at the 15th step of the previous segment, use that retrieved value here, Ethereum Address is the public address created with previous steps, RigName is the name of the machine, which is optional, and thus can be omitted if desired. Any custom name can be used there.
How to Tweak the Performance?
Performance of mining can be improved in multiple ways, but this is only relevant for CUDA enabled graphics adapters. Use the following flags when benchmarking and then use the returned hash value at the previous segment’s 8 th step in HashRate placeholder along with the flags. The hash value is generated at 15 th step of segment before the previous segment.
–cuda-block-size: A block is a group of threads which can be executed parallelly, by increasing the block size the application can make use of many threads at the same time. But according to this report after the block size 16,32 depending on the CUDA enabled adapter, the performance gain goes downhill as the time increases. The recommended values are 16,32,64.
–cuda-grid-size: Grid is a group of blocks, as previously, increasing the grid size increases the performance. The recommended values are 8192, 16384, 32768, 65536.
–cuda-parallel-hash: Is a variable parameter which assists in increasing the performance. The recommended values are 8,16.
–cuda-streams: In CUDA stream means a sequence of operations which are executed as they are issued on the video adapter. Here operations mean the mathematical calculations performed by GPU. In both Bitcoins and Ethereum mining, mining means basically solving complex mathematical problems; hence having a higher stream value improves the performance, but there is a limit depending on the model of the graphics adapter. The recommended values are 16,32.
Conclusion
Ethereum is a rising star in the cryptocurrency ecosystem, which plans to lead the information technology to the decentralized way. In Ethereum system, ether is a token which fuels the ecosystem, which can also be traded just as Bitcoins. Ether can be mined with modern graphics adapters just as Bitcoins used to be. The popular selections for this purpose are Nvidia and AMD. Nvidia uses CUDA, whereas AMD uses OpenCL. The Ethminer slightly favors Nvidia GPUs by providing more flags for CUDA APIs, and thus it’s expected that Nvidia GPUs will out perform others. Since contemporary Nvidia graphics adapters are extremely power efficient, it’s more beneficial to use Nvidia graphics adapters compared to AMD which is still popular among Bitcoin miners. Either way Ether is an important part of the future of cryptocurrency, and will probably coexist with Bitcoins instead of replacing it altogether.
Источник