- How to import private keys
- Contents
- Start Bitcoin client [ edit ]
- Unlock your wallet [ edit ]
- Import Private key(s) [ edit ]
- Cleaning up [ edit ]
- Deleting Keys [ edit ]
- Another ways [ edit ]
- Using Blockchain.info [ edit ]
- Using BIPS [ edit ]
- Using Mycelium [ edit ]
- Partial spend from cold storage [ edit ]
- Import key from a paper wallet [ edit ]
- Using bitcoind [ edit ]
- Help:How to import private keys in Bitcoin Core 0.7+
- Contents
- Backup Your Wallet
- Open Debug Window
- Unlock your wallet
- Run Import Command in Debug Window
- Check Key Imported OK
- How to import private keys
- Contents
- Using Blockchain.info
- Using BIPS
- Using Mycelium
- Partial spend from cold storage
- Import key from a paper wallet
- Using bitcoind
- Start Bitcoin client
- Unlock your wallet
- Import Private key(s)
- Cleaning up
- Как экспортировать и импортировать приватные ключи из локального кошелька
- Как экспортировать приватные ключи:
- Как импортировать приватные ключи:
How to import private keys
Enjoyed the article? Share:

Note that messing with ECDSA private keys is very dangerous and can result in losing bitcoins, even long after the import. It is recommended that outside of self-generated vanity addresses, users should never import (or export) private keys. [1]
Contents
Before getting started with importing your wallet’s private keys, let’s clarify three important definitions.
- Backup: A file containing a wallet’s private key information. Backups can be exported from a wallet or imported to a wallet.
- Export: The process of creating a file containing a wallet’s private key data. Exported keys can be imported to a new/different wallet to give access to the Bitcoins (Bitcoin Core, BTC) associated with the exported private key(s).
- Import: The process of gaining control of BTCs via an exported backup. Wallets can import private keys via text files or QR code scanning.
Start Bitcoin client [ edit ]

Note that importing a key to bitcoind and/or Bitcoin-Qt may be dangerous and is not recommended unless you understand the full details of how it works
Unlike third-party wallet.dat manipulation tools such as Pywallet, you do not have to close the Bitcoin client before proceeding. Instead, you need to start the bitcoind server.
- Close bitcoin-qt and start bitcoind -damon in Terminal Emulator. The version of bitcoind MUST be the same as bitcoin-qt!
Bitcoin-QT does not enable its RPC interface by default. To enable it:
- Close Bitcoin-QT and restart it with bitcoin-qt -server.
Unlock your wallet [ edit ]
If you have an encrypted wallet (recommended), you need to unlock it temporarily before importing private keys. The RPC command for unlocking an encrypted wallet is walletpassphrase
. Typing this directly in a bash terminal will leave your wallet passphrase directly in the bash history but there are a couple of techniques you can use to avoid this. Simply add a space before the command:
Another alternative is to use a bash variable:
Import Private key(s) [ edit ]
The last command unlocked your wallet temporarily for 120 seconds, during which time you must import your private keys. Since private keys can be as important as your passphrase, you may want to use the same techniques as above to prevent their being recorded in bash history (bash variable or space before the command):
The importing process is now started. Bitcoind will rescan the entire block data to ensure this key has not been used before. This process will take from one to two minutes, depending on your CPU performance. DO NOT abort it before finishing!
To avoid rescanning run the following.
If no errors occurs, the import is a success and Bitcoin-QT users will be able to see the new address in the GUI immediately. If you need to import more keys, just repeat the instructions above. There is currently no command to import a batch of private keys so you will need to wait a minute or two for each key to be imported.
Cleaning up [ edit ]
This will lock your wallet again (so you don’t have to wait for timeout)
These commands will clear the passphrase and private key from memory if you used the read technique. If you started bitcoind, you will need to stop it before Bitcoin-QT will start again:
Deleting Keys [ edit ]
At some point, you may wish to delete private keys from a wallet.dat file but as of version v0.6.0 of Bitcoin-QT/bitcoind, there is no RPC method available for this purpose [2] .
Another ways [ edit ]
Using Blockchain.info [ edit ]
As of August 2012, possibly the easiest way to import a private key is using Blockchain.info’s My Wallet service. When successully imported through the «Import/Export» screen, the bitcoins assigned to a private key can be immediately sent to any Bitcoin address.
Using BIPS [ edit ]
As of August 2013, BIPS allows for easy import of private key using Paper Wallet — Import. User can choose to type in the private key manually or scan a QR code containing the private key using the camera. The user must wait 6 confirmations for access to the funds, and system is based on batch importation.
Using Mycelium [ edit ]
Steps described are with the following settings:
- Export mode enabled
- Aggregated view disabled
Partial spend from cold storage [ edit ]
Use this function if you would like to keep some funds on the paper wallet.
- Download Mycelium from the Android Play Store or through iTunes.
- Press the menu button and select «Cold Storage»
- Scan in private key
- Select your destination address
- Select the amount
- Press the blue currency tag at the top to toggle currency.
- Send!
After spending, the private key in memory is destroyed so the paper private key remains somewhat secure. Despite this, best practice is to immediately send the remaining balance to a paper wallet that was generated offline.
Import key from a paper wallet [ edit ]
Use this function if you would like to import a private key so all funds are immediately available for spending.
- Download MyCelium from the Android Play Store or through iTunes.
- Key Management
- Press the blue ‘+’ symbol
- Scan in private key
After importing this paper private key, you might consider destroying the original so it cannot be found and your funds stolen. Alternatively, you can keep it safe to be used as an offline backup.
Using bitcoind [ edit ]
If you have Version 7 or later it is now trival. See: How to import private keys v7+
Источник
Help:How to import private keys in Bitcoin Core 0.7+
This page contains sample addresses and/or private keys. Do not send bitcoins to or import any sample keys; you will lose your money.
Before reading this page, users should note that messing with ECDSA private keys is very dangerous and can result in losing bitcoins, even long after the import. It is recommended that outside of self-generated vanity addresses, users should never import (or export) private keys. [1] [2]
Contents
Backup Your Wallet
Although this process is well tested and used you should always take another backup of your wallet.dat file before starting.
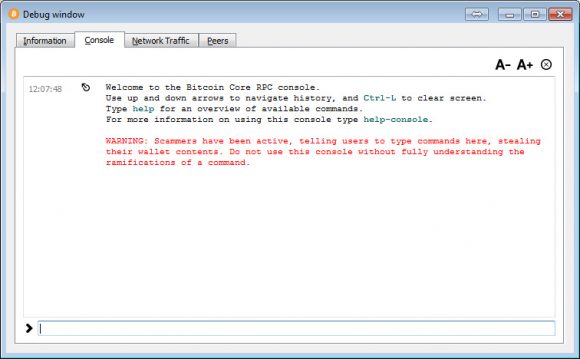
Open Debug Window
Then go to menu: /Help/Debug Window
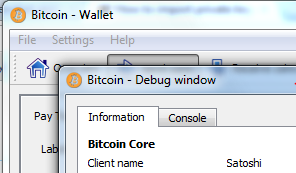
and click on the tab — Console.
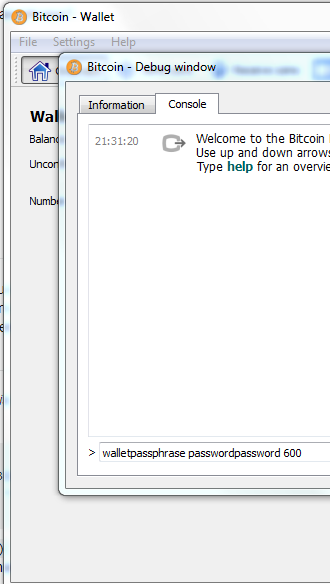
Unlock your wallet
If your wallet is encrypted (I hope it is!) you must unlock it. If not just skip this step.
To do this just type into the box at the bottom:
You need the quotes if there is a space in your phrase else there is no need for them. The 600 means your wallet is unlocked for 10 minutes (600 seconds).
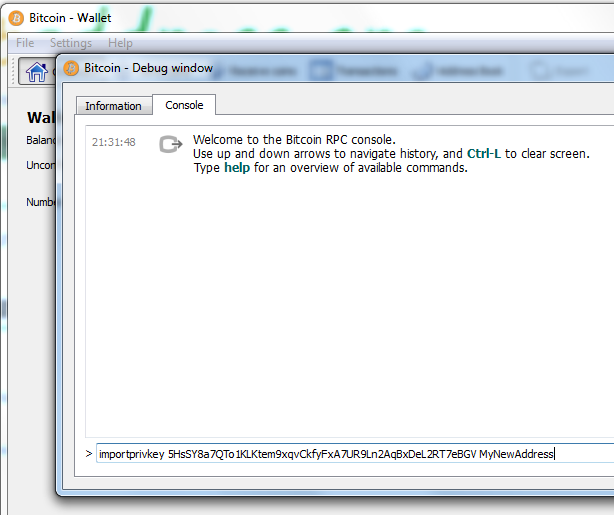
Run Import Command in Debug Window
In the console at the very bottom is a text entry box. In here enter:
The quotes are only needed if you want a space in the label.
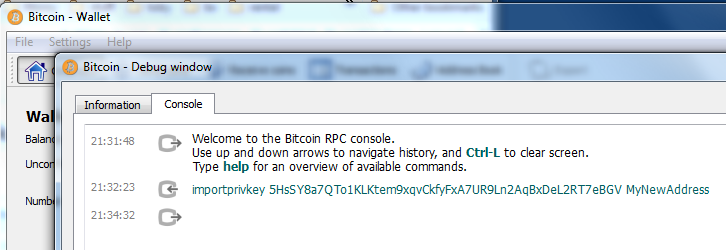
You now have to be patient. On a fast PC it takes 2 minutes to import, and during this time it looks like you application has hung. After waiting a few minutes you will see:
If you want import multiple private keys add false at the end like so:
Do not forget to add the blank label.
for all keys but the last, and then remove the false to allow the rescan. [3]
You are now done. But always best to check it worked.
Check Key Imported OK
Once Imported you can check that you have the address by closing the Debug window and going back to your address book.
Источник
How to import private keys
Before reading this page, users should note that messing with ECDSA private keys is very dangerous and can result in losing bitcoins, even long after the import. It is recommended that outside of self-generated vanity addresses, users should never import (or export) private keys. [1] [2]
Contents
Using Blockchain.info
As of August 2012, possibly the easiest way to import a private key is using Blockchain.info’s My Wallet service. When successully imported through the «Import/Export» screen, the bitcoins assigned to a private key can be immediately sent to any Bitcoin address. It is extremely risky and not recommended to use Blockchain.info or any online third-party service to import private keys, because they can steal your BitCoins if they have the keys. It’s best to import them using bitcoind as described below.
Using BIPS
As of August 2013,  BIPS allows for easy import of private key using Paper Wallet — Import. User can choose to type in the private key manually or scan a QR code containing the private key using the camera. The user must wait 6 confirmations for access to the funds, and system is based on batch importation. It is extremely risky and not recommended to use BIPS or any online third-party service to import private keys, because they can steal your BitCoins if they have the keys. It’s best to import them using bitcoind as described below.
Using Mycelium
Steps described are with the following settings:
- Export mode enabled
- Aggregated view disabled
Partial spend from cold storage
Use this function if you would like to keep some funds on the paper wallet.
- Download Mycelium from the Android Play Store or through iTunes.
- Press the menu button and select «Cold Storage»
- Scan in private key
- Select your destination address
- Select the amount
- Press the blue currency tag at the top to toggle currency.
- Send!
After spending, the private key in memory is destroyed so the paper private key remains somewhat secure. Despite this, best practice is to immediately send the remaining balance to a paper wallet that was generated offline.
Import key from a paper wallet
Use this function if you would like to import a private key so all funds are immediately available for spending.
- Download Mycelium from the Android Play Store or through iTunes.
- Key Management
- Press the blue ‘+’ symbol
- Scan in private key
After importing this paper private key, you might consider destroying the original so it cannot be found and your funds stolen. Alternatively, you can keep it safe to be used as an offline backup.
Using bitcoind
If you have Version 7 or later it is now trival. See: How to import private keys v7+
If you are using Cold storage, a Paper wallet or generating vanity addresses you may have a need to import a Private key. Since Bitcoin-QT/bitcoind v0.6.0, you can import private keys using built-in RPC command importprivkey. Before v0.6.0, you needed to rely on third-party wallet.dat manipulation tool such as Pywallet.
This article describes how to import a private key through the RPC API of bitcoind, which is a topic for advanced users.
Note that importing a key to bitcoind and/or Bitcoin-Qt may be dangerous and is not recommended unless you understand the full details of how it works
Start Bitcoin client
Unlike third-party wallet.dat manipulation tools such as Pywallet, you do not have to close the Bitcoin client before proceeding. Instead, you need to start the bitcoind server.
- Close bitcoin-qt and start bitcoind -daemon in Terminal Emulator. The version of bitcoind MUST be the same as bitcoin-qt!
Bitcoin-QT does not enable its RPC interface by default. To enable it:
- Close Bitcoin-QT and restart it with bitcoin-qt -server.
Unlock your wallet
If you have an encrypted wallet (recommended), you need to unlock it temporarily before importing private keys. The RPC command for unlocking an encrypted wallet is walletpassphrase
. Typing this directly in a bash terminal will leave your wallet passphrase directly in the bash history but there are a couple of techniques you can use to avoid this. Simply add a space before the command:
Another alternative is to use a bash variable:
Import Private key(s)
The last command unlocked your wallet temporarily for 120 seconds, during which time you must import your private keys. Since private keys can be as important as your passphrase, you may want to use the same techniques as above to prevent their being recorded in bash history (bash variable or space before the command):
The importing process is now started. Bitcoind will rescan the entire block data to ensure this key has not been used before. This process will take from one to two minutes, depending on your CPU performance. DO NOT abort it before finishing!
To avoid rescanning run the following.
If no errors occurs, the import is a success and Bitcoin-QT users will be able to see the new address in the GUI immediately. If you need to import more keys, just repeat the instructions above. There is currently no command to import a batch of private keys so you will need to wait a minute or two for each key to be imported.
Cleaning up
This will lock your wallet again (so you don’t have to wait for timeout)
These commands will clear the passphrase and private key from memory if you used the read technique. If you started bitcoind, you will need to stop it before Bitcoin-QT will start again:
Источник
Как экспортировать и импортировать приватные ключи из локального кошелька
 Увеличение количества форков Bitcoin привело к тому, что многие люди пытаются получить свои «бесплатные монеты» по разному, самым простым способом из них, как правило, является хранение монет в локальном кошельке, экспорт приватных ключей из локального кошелька Bitcoin и их импорт в кошелек форка. В качестве меры безопасности всегда рекомендуется сначала перенести все свои биткоины на новый адрес, а затем уже экспортировать старый кошелек, на котором находились монеты на момент форка от сети Bitcoin Blockchain. Таким образом вы обезопасите себя от хищения ваших BTC. Учитывая недавнее добавление официальной поддержки SegWit, возможно сейчас самое время обновить кошелек Bitcoin Core, создать новый адрес с поддержкой SegWit и перенести туда все ваши монеты, а затем уже начинать получать бесплатные монеты новых Bitcoin-форков с помощью приватного ключа от старого адреса.
Как экспортировать приватные ключи:
- Запустить ваш Bitcoin Core клиент или другой QT-wallet.
- Кликнуть в пункт меню «Помощь (Help)» в верхней части окна.
- Выбрать пункт «Debug window».
- Перейти на вкладку «Console» Для ввода команд.
- Разблокировать свой кошелек (если он зашифрован) с помощью команды: walletpassphrase «пароль вашего кошелька» 600.
- Экспортировать приватные ключи с помощью команды: dumpprivkey «ваш биткоин адрес».
- Скопировать и сохранить ваш приватный ключ.
- Заблокировать ваш кошелек с помощью команды: walletlock.
Как импортировать приватные ключи:
- Запустить ваш Bitcoin Core клиент или другой QT-wallet.
- Кликнуть в пункт меню «Помощь (Help)» в верхней части окна.
- Выбрать пункт «Debug window».
- Перейти на вкладку «Console» Для ввода команд.
- Разблокировать свой кошелек (если он зашифрован) с помощью команды: walletpassphrase «пароль вашего кошелька» 600.
- Экспортировать приватные ключи с помощью команды: importkey «приватный ключ».
- Проверить что новый Bitcoin адрес был добавлен в кошелек.
- Заблокировать ваш кошелек с помощью команды: walletlock.
Обязательно сразу же импортируйте свой приватный ключ, как только установите кошелек одного из форков биткоина для получения бесплатных монет, иначе вам может понадобиться повторно синхронизировать кошелек форка. Если вы не переместите все ваши наличные BTC на другой адрес, перед тем как экспортировать и импортировать ваш приватный ключ в кошелек форка для получения бесплатных монет, вы можете потерять все свои BTC.
Имейте ввиду, что некоторые СКАМ-форки создаются специально, чтобы попытаться похитить BTC у невнимательных или ленивых держателей, которые могут захотеть получить бесплатные монеты, ведь многие любят халяву, но при этом которые достаточно ленивы, чтобы перенести свои средства на другой аккаунт. Даже с популярными форками стоит держать «ухо в остро» и никогда не передавать приватные ключи кошельков, на котором в данный момент хранятся значительные средства. Ведь кто знает приватный ключ, может управлять средствами на кошельке.
Подпишись на наш Telegram канал @cryptoage и Вконтакте, узнавай новости про криптовалюты первым.
Общайся с криптоэнтузиастами и майнерами в Telegram чате @CryptoChat
Источник